


iBoard - ABOUT
iBoard is a little practicing project, figuring out how Elixir-development and AI comes together. So, I recently wrote this Blog-server. The content here doesn’t really matter! The project is not public (yet) but will be published at GitHub once it fulfills some basic quality standards ;-)
The iBoard Project This web application is written in Elixir with Phoenix, LiveView, TailwindCSS, DaisyUI, Ecto/Postgres, to name the most important.
ExDocs
The full dependency list reads like:
:bcrypt_elixir, "~> 3.0"
:phoenix, "~> 1.8.3"
:phoenix_ecto, "~> 4.5"
:ecto_sql, "~> 3.13"
:postgrex, ">= 0.0.0"
:phoenix_html, "~> 4.1"
:phoenix_live_reload, "~> 1.2", only: :dev
:phoenix_live_view, "~> 1.1.0"
:lazy_html, ">= 0.1.0", only: :test
:phoenix_live_dashboard, "~> 0.8.3"
:esbuild, "~> 0.10", runtime: Mix.env() == :dev
:tailwind, "~> 0.3", runtime: Mix.env() == :dev
:heroicons, github: "tailwindlabs/heroicons", tag: "v2.2.0"
:gen_smtp, "~> 1.2"
:swoosh, "~> 1.5"
:castore, "~> 1.0"
:req, "~> 0.5"
:telemetry_metrics, "~> 1.0"
:telemetry_poller, "~> 1.0"
:gettext, "~> 1.0"
:gettext_sigils, "~> 0.1.0"
:jason, "~> 1.2"
:dns_cluster, "~> 0.2.0"
:bandit, "~> 1.5"
:tzdata, "~> 1.1"
:boundary, "~> 0.10", runtime: false
:ex_doc, "~> 0.31", only: [:dev, :prod], runtime: false
:earmark, "~> 1.4"
With a big hug to this gorgeous community!
Follow the tag #iboard if you’re interested in the faith of this project.
Features so far (Buzzwords)
- Accounts, Users (phx.gen.auth)
- Posts, Drafts, Authors, Moderators, Likes, Followers
- User management, invite by e-mail
- Supports DaisyUI Themes
- Supports Locale and Timezone
Introducing Groups: Share with exactly the people you choose
Until now, a post here could be public, private, or sent as a direct message. That covered the extremes — everyone, or just one person — but not the middle ground most of us actually live in: this handful of people, and no one else.
Groups fill that gap.
Create a group in seconds
Head to My Groups in the sidebar (or /groups) and hit New group. Give it a name, and start adding people:
- Friends are added instantly — they’re active right away.
- Anyone else gets an email invitation. Once they confirm, they join the group and become a mutual friend, so the connection works both ways.
Posts for members only
When you write a post, visibility now has a Specific Groups option. Pick which groups may read it — and, separately, which of those may comment. Only active members of a listed group can see or reply.
Every group-restricted post carries a “Who can read this” section, so it’s always clear exactly who’s in the room. No guessing, no accidental oversharing.
It lands in the inbox
Published group posts show up in each member’s inbox (/dm) right alongside direct messages, complete with a Group badge and per-person read/unread tracking — the same unread counter you already know from the navbar. Nobody misses what’s meant for them.
A home for every group
Each group has its own page (/groups/:id) listing its members and how many posts each has published. Any active member can invite new people; you can remove anyone you added and leave whenever you like; and the owner can manage everyone.
Groups are yours to shape — start one today and share with just the right circle.
An Observation on AI-Generated Documentation
With the rise of modern AI tools, the concept of generating complete, gapless documentation for an entire codebase seems tempting at first glance. It appears to be the ultimate solution: every function, variable, and logic branch automatically explained. However, upon closer inspection, this approach reveals significant downsides.
No seasoned developer would voluntarily document every single detail—and for good reason. If every line of code were commented, the famous mantra “Read the fucking code” (RTFC) would lose its validity. Yet, RTFC remains entirely justified, especially when dealing with low-level details. Often, the code itself is the most precise description of what is happening at the machine level.
Documentation intended for users—whether other developers or DevOps engineers—should not attempt to include everything. Such “completeness” dilutes the critical information. Readers are forced to wade through a mountain of trivial details to find the actual architectural decisions or usage patterns. This is frustrating, time-consuming, and ultimately leads to the documentation being ignored because the signal gets lost in the noise. Good documentation curates knowledge; it does not merely duplicate it.
The End of Small Open Source Projects?
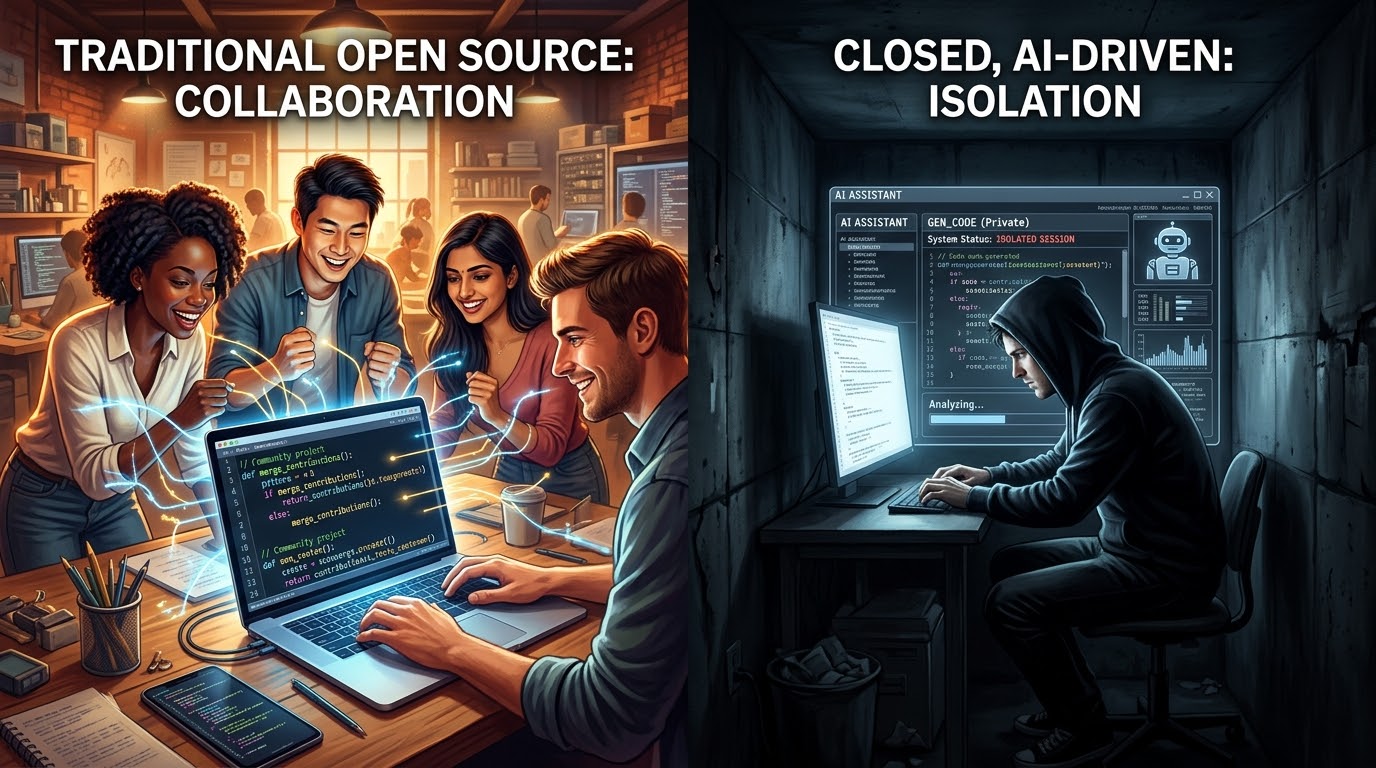
Small open-source projects, often sustained by only a handful of contributors, are facing a critical turning point. Historically, these initiatives thrived on the necessity of collaboration and code sharing. However, Artificial Intelligence is fundamentally altering this dynamic. Developers can now generate complex features, bug fixes, and even entire modules using AI assistants alone, removing the dependency on external help or peer reviews.
Yet, this surge in efficiency carries a paradoxical risk: the motivation to share work publicly is diminishing. If every developer can complete their “private closed work” autonomously without relying on the community, the ecosystem risks fragmentation. Instead of refining a shared open solution together, we may see the rise of isolated, AI-generated silos. The thesis is not that open source will vanish, but that the foundation of small, purely community-driven projects is eroding because the barrier to autonomous development is lowering while the incentive for openness fades.
Latest Changes
Introducing the Next Generation of Our Blog: Public Reading, Real-Time Analytics, and Administrative Mastery
We’ve been busy over the last few weeks! Today, we are thrilled to share a massive set of updates that drastically improve how you read, moderate, manage, and monitor the blog. Whether you are a casual visitor, an active author, or a site administrator, there is something major in this release for you.
Here is a deep dive into the highlights of the latest changes.
1. Public Reading Mode: No Login Required! 📖
The biggest architectural shift in this release is that the blog is now public-facing.
Previously, visitors had to log in just to browse posts. We have opened our doors: anyone can now read posts, explore the news feed, learn about authors, and filter by tags at /posts, /news, /authors, and /tags without needing an account.
To keep our community safe and high-quality:
- Writing and Editing: Creating new posts, editing, liking, and pinning still strictly require being logged in.
- Anonymous Safety: The comment form is hidden for anonymous viewers, and likes are displayed as a sleek, read-only heart badge.
- User & Author Contexts: Public pages hide draft posts and restricted visibility posts (e.g., “friends-only” or “users-only”) dynamically, depending on whether the visitor is logged in and authorized.
2. Real-Time Session Analytics & Interactive SVG Charts 📊
For administrators, we’ve built a powerhouse of an analytics suite at /admin/session-log/stats powered by Phoenix PubSub and live telemetry.
- Live Summary Metrics: Track Total, User, Guest, and Active Country counts in real time as traffic hits the server.
- Interactive SVG Donut/Pie Chart: Hover over the “Top Countries” card to interact with custom SVG segments showing percentage shares and country legends.
- Interactive SVG Bar Charts: Watch active session distributions by day and hourly peak activity update live before your eyes without a page reload.
- Flags Box Modal: Click any item in the trimmed country flags box to pop open a scrollable, detailed modal listing all active country session counts.
- Auto-Archiving: A background worker now automatically archives session logs older than a configurable threshold (defaulting to 24 hours) to keep the database lean and performant.
3. Advanced Runtime Configuration UI ⚙️
No more editing files on the server or manually redeploying just to tweak a setting!
We introduced WAppCore.RuntimeConfiguration, a smart memory cache that sits in front of your environment variables and .env file. We then built a control center at /admin/settings where administrators can:
- Group and Filter Settings: Quickly search through settings. Compile-time constants and sensitive credentials (which are safely masked) are grouped by their root domains (DB, MAIL, etc.).
-
On-the-Fly Editing: Tweak keys like
WELCOME_MESSAGEorBROWSER_TITLEand hit Save to atomically rewrite the.envfile with clean formatting. -
Zero-Downtime Reloads & Restarts: Reload the on-disk
.envfile into memory instantly, or trigger an application restart (:init.restart/0) right from the web page. Sessions survive perfectly since they are backed by cookie-based signing!
4. Approval-Based Registration & Anti-Spam Blacklists 🛡️
To support a private or curated community, we have redesigned the onboarding experience from the ground up:
- Moderated Application Queue: Self-registration can now be disabled or set to require moderator approval. Visitors must supply their email and write a mandatory multiline reason (which must be at least 3 words long to block single-word “test” or spam submissions).
- Silent Rejections and Deletions: Reviewers can accept applications (which automatically triggers an invitation link), reject them with a custom explanatory message, or reject silently to prevent notifying spammers. Complete deletion of spam entries is also just a click away.
- Domain Blacklist: Administrators can manage regular expressions to block specific domains (like temporary email services) from even submitting an account request.
-
Toggle Gated Flows: Turn self-registration or account requests on or off with native daisyUI toggles in
/admin/settings.
5. Modern Mobile & Desktop Layout Overhaul 📱
The user interface has received a top-tier polish focusing on responsiveness and smooth micro-interactions.
- Top Bar & Sidebar Improvements: On phones, settings, timezone selectors, and theme options elegantly fold into a “Preferences” section at the bottom of the sidebar drawer. Tapping any navigation link automatically slides the drawer shut so you can read immediately.
- Active Sidebar Link Auto-Centering: A live JS hook automatically scrolls your active navigation link into vertical center alignment when the page loads.
- Sticky Table Headers: When scrolling through massive lists of users or posts, the column headers stick to the top of the viewport just below the sticky navigation bar, adjusting their heights dynamically on small viewports.
-
Draggable & Resizable Table Columns: Drag column headers horizontally to resize columns. Your choices are saved in browser
localStorageand persist across page loads and LiveView patches. - Image Preview Fullscreen: Clicking the enlarge icon in the image preview lightbox now correctly triggers true browser fullscreen mode inside the active modal.
6. Bilingual Post Emails & Custom Assets 📧
Notification emails for new posts, comments, and direct messages have been rewritten for a world-class reading experience:
- Dual-Language Formatting: Post emails are sent in both English and German. If a post has no translation, it elegantly prints the content once without duplicate headers.
- Inline Embedded Images: Images attached to posts are embedded inline directly in your HTML mail body—no download link clicks required.
- Password Show/Hide: Input elements on forms now feature a native password show/hide eye-icon.
- Datalist Dropdowns: Replaced standard browser autocomplete fields with custom, high-fidelity select menus that handle multi-selection (for tags) and arrow-key navigation.
7. Major Engine Upgrades 🚀
Under the hood, we upgraded the core environment to run on Erlang/OTP 29, Elixir 1.20, Phoenix 1.8.8, and Phoenix LiveView 1.2.3.
-
Enjoy blazing-fast performance, improved compilation times, robust type safety, and optimized Docker build layers (thanks to our streamlined
.dockerignorefilters). -
Fully localized support is now active for 6 distinct locales, including formal German (Sie) (
de_DE), informal German (Du) (de_AT), Standard English (en), British English (en_GB), and a complete dialect translation in Züritüütsch (Swiss German) (de_CH).
What’s next?
These quality-of-life and performance upgrades set a rock-solid foundation for future features. Explore the public pages, customize your preferences in the sidebar, and let us know what you think of the new real-time admin charts!
Happy reading!
Der Fürst und seine Erben
In seinem Werk „Der Fürst und seine Erben“ wagt Peter Sloterdijk einen intellektuellen Spagat zwischen historischer Analyse und zeitgenössischer Diagnose. Der Titel evoziert bewusst Niccolò Machiavellis klassischen „Fürsten“, doch Sloterdijk erweitert den Blickwinkel: Es geht nicht nur um die Kunst der Herrschaft, sondern um das Schicksal der Macht in einer Epoche, die traditionelle Autoritäten hinterfragt.
Sloterdijk untersucht, wie sich die Figuren der Führung und die Mechanismen der Einflussnahme gewandelt haben. Wer sind die „Erben“ in einer modernen, oft führungslos wirkenden Gesellschaft? Sind es die Technokraten, die Medienmacher oder vielleicht die Algorithmen selbst? Mit seiner charakteristischen sprachlichen Präzision und einem scharfen analytischen Blick dekonstruiert der Philosoph die Illusionen der politischen Repräsentation und zeigt auf, wo die wahren Machtzentren heute liegen.
Dieses Buch ist keine einfache Gebrauchsanweisung für Führungskräfte, sondern eine tiefgründige Reflexion über die Verantwortung und die Unausweichlichkeit von Elitenbildung – ein Thema, das in aktuellen Debatten oft tabuisiert wird. Sloterdijk zwingt den Leser, unbequeme Fragen zur Struktur unserer Gesellschaft zu stellen. Für alle, die verstehen wollen, warum alte Machtmodelle kriseln und welche neuen Formen der „Fürstlichkeit“ im 21. Jahrhundert entstehen, ist diese Lektüre unverzichtbar. Ein anspruchsvolles, aber höchst gewinnbringendes Werk für den wachen Geist.
The Silence That Speaks

Today, June 14th, “world day of the diary” - we honor not just a date on the calendar, but the power of the written voice. On this day in 1942, a young girl received a diary for her birthday and began to write—words that would later move the world. A diary is more than paper and ink; it is a safe harbor for thoughts, a mirror of the soul, and a historical testament against forgetting.
By writing in our diaries today, we preserve our own truth. In a noisy world, the diary offers a space of silence where we can be honest with ourselves. Every line is a step toward self-reflection, every entry proof that our stories matter. Let us take up the pen today to record what was, what is, and what could be.
Elixir 1.20 released
Elixir 1.20 marks a historic milestone for the language: it is now officially a gradually typed language.
The most significant feature is the introduction of native, optional typing integrated directly into the compiler. Unlike previous approaches that relied on external tools, Elixir 1.20 can now define and verify type information for functions, modules, and structures directly within the code at compile time. This enables better documentation, earlier error detection, and improved tooling support (such as auto-completion) without sacrificing Elixir’s dynamism and flexibility. Developers can decide how strictly they want to apply typing in their projects.
In addition to typing, this release brings improvements to compiler performance and enhancements to pattern matching that facilitate working with the new types. It is the largest update since the introduction of protocols and defines the future direction of the language’s development towards greater safety and maintainability in large codebases.
Wenn der Himmel kein Ende findet
Erinnerung an den Schnürlregen der 1970er

Es gibt Wetter, und es gibt den „Schnürlregen“. Dieses Wort, das vor allem in Österreich und Südbayern zu Hause ist, beschreibt kein gewöhnliches Niederschlagsereignis. Es malt ein Bild von feinen, nahtlosen Linien – wie Schnüre –, die den Himmel mit dem Boden verbinden und scheinbar ewig fallen. Wer die 1970er Jahre bewusst erlebt hat, erinnert sich oft mit einer Mischung aus Nostalgie und Grauen an die Augusttage jener Dekade, an denen dieser Regen zur dominierenden Lebensrealität wurde.
Die Atmosphäre der 1970er Jahre
In den 1970ern war das Leben noch etwas langsamer, aber das Wetter diktierte den Takt unerbittlicher als heute. Es gab keine Wetter-Apps, die stündliche Updates lieferten. Man schaute auf den Barometer an der Wohnzimmerwand oder vertraute dem Gefühl in den Knochen. Der Schnürlregen im August jener Jahre war kein kurzer Schauer, der die Hitze brach. Es war ein Dauerzustand.
Berichte und Witterungsdaten aus dieser Zeit, etwa von der ZAMG oder MeteoSchweiz, zeichnen ein Bild von extrem niederschlagsreichen Sommern in bestimmten Regionen. Der August, eigentlich der Monat der Ernte und der letzten Sommerferienwochen, verwandelte sich oft in eine graue Suppe. Der Regen fiel nicht in Tropfen, die man zählen konnte, sondern als geschlossene Wand. Die Luft roch nach nassem Asphalt, abgestandenem Heu und Erde.
Ein Gefühl der Ohnmacht und Gemütlichkeit
Für die Landwirtschaft war der Schnürlregen der 70er oft eine Katastrophe. Das Getreide auf den Feldern konnte nicht gedroschen werden, es drohte zu keimen oder zu schimmeln. Die Erntepläne gerieten ins Wanken, und die Gesichter der Bauern wurden länger. Doch für die Stadtbevölkerung und die Kinder hatte dieses Wetter auch eine eigene, fast schon gemütliche Melancholie.
Es war die Zeit, in der der Sommerurlaub ins Wasser fiel, aber auch die Zeit, in der man gezwungen war, innezuhalten. Man spielte Brettspiele am Küchentisch, hörte Radio, da das Fernsehen oft nur ein rauschendes Programm bot, oder starrte aus dem Fenster, während die „Schnüre“ prasselten. Es gab kein „schnell mal rausgehen“. Der Regen definierte den Radius des Tages.
Warum es sich so anfühlte
Klimatologisch betrachtet waren die 1970er Jahre eine Übergangsphase. Es war noch vor der drastischen Erwärmung, die wir heute erleben, aber die Wettermuster konnten extrem blockierend sein. Tiefdruckgebiete blieben oft wochenlang über den Alpen liegen und saugten feuchte Luftmassen an, die sich als ergiebiger Dauerregen entluden. Der Begriff „Schnürlregen“ passt hier perfekt: Es war kein Guss, kein Gewitter, kein Hagel. Es war ein gleichmäßiges, monotones Rauschen, das die Zeit zu dehnen schien.
Heute, in Zeiten von Klimawandel und extremen Wetterereignissen wie Starkregenfluten, wirkt der harmlose, aber endlose Schnürlregen der 70er fast schon friedlich. Er war lästig, er war kalt, aber er war selten zerstörerisch im heutigen Ausmaß. Er war einfach da. Wie eine graue Decke, die sich über den August legte und uns lehrte, dass man manche Dinge – wie das Wetter – einfach hinnehmen muss, bis sie von selbst aufhören.
Vielleicht vermissen wir heute sogar ein wenig diese Beständigkeit des Unwetters. Denn im Gegensatz zu den unberechenbaren Stürmen von heute, wusste man beim Schnürlregen wenigstens eines genau: Es wird heute nichts mehr trocken.
User Manual: Write a Post
Getting started
To create a new post, open the navigation sidebar and click New Post. You will land on a form with two language tabs at the top (EN and DE) and several fields below.
Choosing one or both languages
Each post can be written in English, German, or both. The two tabs at the top of the form each have a checkbox:
- Tick the box next to a language to include that language in the post.
- Untick it to exclude the language. (At least one language must remain ticked.)
- Click the language label itself to switch the editor to that language without touching the checkboxes.
If you publish a post with both languages, readers see the version that matches their selected content language.
Subject and body
The Subject is the headline of your post. The Body is the article itself and is written in Markdown. You can use:
-
# Headings,## Sub-headings, etc. -
**bold**,*italics*,`inline code` - Bulleted and numbered lists
-
Links:
[label](https://example.com) - Fenced code blocks with three backticks
-
Block quotes with
>
The body textarea grows automatically as you type.
Attaching files and images
Below the body you will find the Attachments uploader. You can drop up to five files of up to 50 MB each into that area, or click to pick them from your computer.
For every attachment you can fill in:
- Title — used as the link label when the file is not an image.
- Description — optional caption.
To embed an image inline in your text, insert a placeholder anywhere in the body using curly braces around the file name:
Here is the diagram:

{architecture.png}

And here is a downloadable PDF: {whitepaper.pdf}
When the post is rendered:
-
Files whose content type starts with
image/are inlined as<img>tags. - All other files become Markdown links to the uploaded file.
Tip: click the file name of any attachment in the form to copy its {placeholder} to your clipboard. A short flash confirms the copy.
Tags
The Tags field accepts space-separated words, for example:
howto elixir phoenixWhen you focus the field, a dropdown opens with all tags that already exist in the system. Click a suggestion to add it, or just type a new tag — new tags are created on save.
Visibility
The Who can see this? select controls the audience:
- Public — anyone on the internet can read the post.
- Registered Users — only signed-in users.
- Friends Only — only your mutual followers.
- Direct Message — only the specific recipients you pick.
When you choose Direct Message a recipient picker appears. Type a name to search and click a result to add it.
Comments
The Who can comment? select is independent from visibility:
- Nobody (Turned Off) — comments are disabled.
- Friends / Followers / Registered Users / Public — progressively wider audiences.
Saving as a draft
Clicking Save Post does not publish the post — it is stored as a draft. Drafts are only visible to you (and to admins), so no follower will see anything yet. This gives you a chance to preview the rendered article and fix anything before the audience sees it.
Finding your drafts
Drafts are hidden from the default /posts view. To see them:
-
Open My Postings (
/posts). -
In the toolbar at the top, find the three-button switch (the three document icons sitting next to each other):
- No Drafts (single document) — hides drafts, the default.
- With Drafts (document with overlay) — shows published posts and drafts together. Drafts are marked with a small “Draft” indicator in the listing.
- Drafts Only (empty document) — shows only your drafts.
- Pick With Drafts or Drafts Only and your unpublished post appears in the list.
Click the draft to open the preview. This is exactly how the article will look once published — images, attachments, formatting and all.
Publishing the draft
When you are happy with the preview, publish it in one of two ways:
- From the listing: in the row of action icons next to your draft, click the green eye icon (Publish).
- From the post itself: the toolbar above an unpublished post shows a Publish button.
Either path opens a small dialog asking whether you want to notify followers:
- Yes, send e-mail — the post is published and a notification email is sent to your followers (and friends, deduplicated). The email is bilingual when the post is bilingual, includes inline images, and attaches all non-image files.
- No, just publish — the post is published without sending any email. Use this for minor posts or when you don’t want to bother subscribers.
After publishing, the eye icon turns into an eye-with-slash icon (Unpublish) so you can move the post back to draft state any time.
About the “e-Mail followers” checkbox on the form
The checkbox e-Mail followers that sits next to the Save button is not used to publish a fresh draft — at that point the post has no published_at date yet, so no email is sent regardless of the checkbox.
This checkbox only matters when you edit an already-published post: tick it before saving to send a fresh notification email about the update; leave it unticked to save the edit silently. New drafts always use the publish dialog described above to decide on email.
Latest Changes and Improvements
What’s new on the blog
A short tour of the changes that landed over the last few days. Most of it is quality-of-life work on the read and admin experience.
Resizable table columns
Every table in the application — the user admin, the posts table, attachments, authors, registration requests — now has draggable column widths.
- Hover any column header and you’ll see a thin separator line on the right with a small diagonal grip in the corner.
- Grab the grip and drag horizontally to resize the column.
- Your widths are saved per table and per column to your browser’s local storage, so they survive reloads, navigation, and re-renders.
Since each user keeps their own preferences in their own browser, you can shape the tables to fit your screen without bothering anyone else.
Like count column on the posts table
The /posts table view has a new heart column between Comments and Attachments. It shows the like count as a small red badge when a post has any likes. The old unlabeled icon column is gone — the pinned (★) and system (📍) indicators now sit inline right next to the post subject, so the table is one column shorter overall.
Smaller screens, much better
If you read the blog on a phone (iPhone mini and similar), you’ll notice things fit a lot better now.
- Top bar. The direct-message icon (with the unread badge) and your avatar are now visible at every viewport size, not just on wide screens. Settings, language, timezone, and the theme picker move to a “Preferences” section at the bottom of the sidebar when they don’t fit in the top bar.
- Sidebar. Tapping any link in the sidebar — including the preferences — automatically closes the drawer, so you don’t have to dismiss it manually before you can read.
- Post detail page. The toolbar above each article (back, reader/standard, edit, print) no longer overflows. On phones, the buttons collapse to icons, so you can find the print button without scrolling sideways.
- Tags page, home stats, admin headers, flash messages. All re-flowed for narrow viewports — no more horizontal scrolling on a 375px screen.
- Markdown content. Long URLs wrap, large images shrink to the viewport, and wide tables get their own internal horizontal scroller instead of forcing the whole page to scroll.
Tag selection scrolls to the article
When you pick a tag on /tags, the page now smoothly scrolls to the first matching article. The header stays just above the fold so you can see what you’ve selected.
Image preview: fullscreen finally works
Clicking the fullscreen button in the image preview was, until now, invisible: the dialog rendering covered the fullscreen layer, and the enlarged view only flashed for a second as the modal closed. Fullscreen now applies to the inner content of the preview, so the enlarged image is visible right away. Press Esc to exit fullscreen; the preview stays open.
No more duplicate emails for mutual followers
If you and another author follow each other (so you’re “friends”), you used to receive two notification emails every time the other person published a new post: one as a friend, one as a follower. Each user now lands in exactly one notification bucket, so you get one email per post — never two.
My Server Migration from AWS to Infomaniak in Switzerland

It is done. After much deliberation and some preparation time, I pulled the plug and migrated my entire server infrastructure from Amazon Web Services (AWS) to Infomaniak in Switzerland. For me, this step was not just a technical decision, but primarily a matter of principle.
In this report, I want to share my reasons for making this switch.
1. From Complexity to Simplicity
AWS is undoubtedly a powerful tool. It offers a technical solution for almost every conceivable problem. But for me – and probably for many other small to medium-sized projects – that is exactly the issue: the sheer volume of services, the cluttered dashboard, and the often incomprehensible pricing models are simply overwhelming. It feels like you spend more time setting up the right permissions (IAM) and trying to figure out why a service suddenly costs more than you do actually working on your projects.
Infomaniak, on the other hand, feels like a breath of fresh air. The interface is clean, logically structured, and above all, simple. You get exactly what you need without having to fight your way through a jungle of cryptic acronyms. The services do what they are supposed to do, the pricing is transparent and fair, and the learning curve is refreshingly gentle.
2. Digital Sovereignty: Goodbye, US Big Tech!
The second, equally important reason was my strong desire to reduce my dependence on major US technology corporations. In an era where data is the most valuable commodity, I no longer wanted to leave my infrastructure to the whims and privacy policies of American hyperscalers.
In Infomaniak, I found a partner that is not only based in Europe (Switzerland) but also strongly focuses on data privacy, sustainability (100% renewable energy), and independence. It is incredibly reassuring to know that my data falls under strict Swiss data protection laws rather than sitting on the servers of a company ultimately subject to the US Cloud Act.
Conclusion
The move naturally cost time and effort – a migration is never a walk in the park. But looking back, it was the best decision for my setup. I now have a system that I can fully oversee again, that doesn’t crush me with unnecessary complexity, and that gives me back a large chunk of my digital sovereignty. A clear win!
Offline Cafè Oida
Erstes Offline-Cafe in Wien eröffnet

Am Samstag hat in Wien das nach eigenen Angaben erste „Digital-Detox-Cafe“ eröffnet. Das „Offline Oida“ befindet sich im Innenhof einer ehemaligen Molkerei auf der Wieden. Alle elektronischen Geräte wie Handys und Laptops sollen dort ausgeschaltet bleiben.
Unter der Woche ist das Cafe das normale „Lokal im Hof“, doch am Wochenende verwandelt es sich nun in eine Zone ohne Klingeln und Scrollen. Geöffnet hat es ab sofort samstags und sonntags von 10.00 bis 18.00 Uhr.
Quelle: Der ganze Artikel auf ORF W…
Fix: duplicated e-mails for followers

Until this version, when an author created a post, e-mails to followers was sent. When the author then published a post, another e-mail was sent. If the author fixed a typo and saved the post, another e-mail was sent.
Of course, this is annoying!
This fix now asks the author either e-mails should be sent.
I hope this makes the system more fun to use 😉
iBoard - README
WAppCore - The iBoard Project
A Phoenix 1.8 web application with LiveView, real-time PubSub, markdown posts, comments, user authentication, and multi-locale support.
Quick start (development)
cp .env.example .env          # copy and adjust settings
mix setup                     # install deps, create and migrate DB, build assets
mix run priv/repo/seed-posts.exs # (optional) seed markdown posts from data/posts/
mix phx.server                # start the dev server
Visit http://localhost:4000.
Emails sent in development are captured locally and visible at http://localhost:4000/dev/mailbox.
Environment variables
Copy .env.example to .env and adjust the values. The application loads the
.env file automatically on startup.
Development
| Variable | Description | Default |
|---|---|---|
ENDPOINT_IP |
IP address Bandit binds to |
127.0.0.1 |
ENDPOINT_PORT |
TCP port the server listens on |
4000 |
ENDPOINT_HOST |
Hostname used in generated URLs (email links) |
localhost |
ENDPOINT_SCHEME |
URL scheme: http or https |
http |
DBUSER |
Database username |
postgres |
DBPASSWORD |
Database password |
postgres |
DBHOST |
Database hostname |
localhost |
DBPORT |
Database port |
5432 |
DBNAME |
Development database name |
w_app_core_dev |
DBNAME_TEST |
Test database name |
w_app_core_test |
POOL_SIZE_DEV |
Database connection pool size |
10 |
LOG_LEVEL |
Logger level (debug, info, warning, …) |
debug |
SECRET_KEY_BASE_DEV |
Secret key base for dev |
(preset in .env.example) |
AVAILABLE_LOCALES |
Comma-separated list of supported locales |
en_US,en_GB,de_DE,de_AT,de_CH |
FALLBACK_LOCALE |
Default locale when none is detected |
en_US |
MAILER_ADAPTER |
local (mailbox UI) or sendgrid |
local |
SENDGRID_API_KEY |
Required when MAILER_ADAPTER=sendgrid |
— |
Production
See DEPLOY.md for a full list of production environment variables and Docker deployment instructions.
Running tests
mix testDocumentation
Generate API docs with ExDoc:
mix docs
The generated docs are written to doc/. In development the docs are also
accessible in the sidebar at /dev/docs.
Deployment
See DEPLOY.
iBoard - Deploy
Deployment Guide
Overview
The application is packaged as an Elixir release and shipped as a Docker image
(iboard/blog:latest). On container start the entrypoint automatically:
-
Loads
/app/.envif present - Creates the PostgreSQL database if it does not yet exist
- Runs all pending Elixir migrations
- Starts the Phoenix server
No manual migration step is required after deploying a new image.
Quick-start package
A ready-to-edit deployment package is included in the repository:
tar -xzf deploy.tgz -C /your/deploy/dirContents:
.env                      # production environment variables — fill in the blanks
docker-compose.yml        # nginx + web + db stack (no extra editing needed)
nginx/conf.d/app.conf     # nginx server blocks — replace "example.com" with your domain
nginx/certs/.gitkeep      # place fullchain.pem and privkey.pem here
data/postgres/            # postgres data volume (created on first start)
data/uploads/             # user-upload volume (created on first start)
README.txt                # five-step quick-start checklist
Minimum steps after extracting:
-
Edit
.env— setENDPOINT_HOST,SECRET_KEY_BASE,PGPASSWORD, andSENDGRID_API_KEY(or switch toMAILER_ADAPTER=local) -
Copy TLS certificates into
nginx/certs/ -
Replace
example.cominnginx/conf.d/app.confwith your domain -
docker compose pull && docker compose up -d
Environment variables
All configuration is read at runtime from environment variables. There are no compiled-in secrets.
Endpoint
| Variable | Description | Default |
|---|---|---|
ENDPOINT_HOST |
Required. Public hostname used in generated URLs and email links (e.g. example.com) |
— |
ENDPOINT_SCHEME |
URL scheme: http or https |
https |
ENDPOINT_PORT |
TCP port Bandit binds to inside the container |
4000 |
ENDPOINT_IP |
IP Bandit binds to. 0.0.0.0 = all IPv4, :: = all IPv4+IPv6 |
0.0.0.0 |
PHX_SERVER |
Set to true to start the HTTP server (always set by docker-compose.yml) |
— |
Note:
ENDPOINT_HOSTandENDPOINT_SCHEMEare used for URL generation only (email links, redirects). The application always binds onENDPOINT_PORTregardless of the scheme. In a typical setup nginx terminates TLS on port 443 and reverse-proxies toENDPOINT_PORT.
Database
| Variable | Description | Example |
|---|---|---|
DATABASE_URL |
Required. Ecto database URL |
ecto://user:pass@host/dbname |
POOL_SIZE |
Database connection pool size |
10 |
ECTO_IPV6 |
Set to true to connect over IPv6 |
false |
Security
| Variable | Description |
|---|---|
SECRET_KEY_BASE |
Required. 64-byte secret used for cookies and tokens. Generate with mix phx.gen.secret. |
Mailer
| Variable | Description | Default |
|---|---|---|
MAILER_ADAPTER |
local — in-memory, /dev/mailbox UI available; sendgrid — sends real email |
local |
SENDGRID_API_KEY |
Required when MAILER_ADAPTER=sendgrid |
— |
Other
| Variable | Description | Default |
|---|---|---|
DNS_CLUSTER_QUERY |
DNS query for clustering multiple nodes | — |
LOG_LEVEL |
Logger level: debug, info, warning, error |
info |
Docker
Prerequisites
- Docker and Docker Compose installed on the host
-
An
.envfile in the same directory asdocker-compose.yml
Minimal .env for Docker
# Phoenix
SECRET_KEY_BASE=<output of: mix phx.gen.secret>
ENDPOINT_HOST=example.com
ENDPOINT_SCHEME=https
ENDPOINT_PORT=4000

# Port exposed to the host (nginx reverse-proxies to this)
EXPOSE_PORT=4000

# PostgreSQL
PGUSER=blog
PGPASSWORD=<strong password>
PGDATABASE=blog_prod

# Mailer
MAILER_ADAPTER=sendgrid
SENDGRID_API_KEY=SG.<your key>
Start
docker compose up -dThis starts:
-
db— PostgreSQL 16, data stored in./data/postgres/ -
web— Phoenix application, uploads stored in./data/uploads/
The database is only reachable inside the Docker network. The web service is
exposed on EXPOSE_PORT (default 4000).
Stop / restart
docker compose down        # stop and remove containers (data volumes are preserved)
docker compose restart web # restart only the web service
View logs
docker compose logs -f web
docker compose logs -f db
Building the Docker image
A build.sh script is provided:
./build.sh          # builds iboard/blog:latest
./build.sh --push   # builds and pushes to Docker Hub
The build uses a multi-stage Dockerfile:
-
Builder —
hexpm/elixirimage; installs npm, compiles assets, builds the Elixir release -
Runner —
debian:bookworm-slim; copies only the release artifact
Nginx reverse proxy (example)
server {
    listen 443 ssl;
    server_name example.com;

    ssl_certificate     /etc/letsencrypt/live/example.com/fullchain.pem;
    ssl_certificate_key /etc/letsencrypt/live/example.com/privkey.pem;

    location / {
        proxy_pass         http://127.0.0.1:4000;
        proxy_http_version 1.1;
        proxy_set_header   Upgrade $http_upgrade;
        proxy_set_header   Connection "upgrade";
        proxy_set_header   Host $host;
        proxy_set_header   X-Real-IP $remote_addr;
        proxy_set_header   X-Forwarded-For $proxy_add_x_forwarded_for;
        proxy_set_header   X-Forwarded-Proto $scheme;
    }
}

server {
    listen 80;
    server_name example.com;
    return 301 https://$host$request_uri;
}
Backups
Two directories on the host contain all persistent data:
| Path | Contents |
|---|---|
./data/postgres/ |
PostgreSQL data directory |
./data/uploads/ |
User-uploaded files (avatars, post attachments) |
Back up both directories to preserve the full application state.
Releases (without Docker)
To build a release tarball directly:
MIX_ENV=prod mix assets.deploy
MIX_ENV=prod mix release
The tarball is written to _build/prod/rel/w_app_core/. Extract it on the
target host and run:
# Set all required environment variables, then:
bin/entrypoint.sh start
The entrypoint handles .env loading, upload directory setup, DB creation, and
migrations before starting the server.
Also, see README
Framework 13" AMD Ryzen Meets Omarchy

There is a unique kind of magic in putting together your own computer. But building a laptop? That takes the experience to a whole new level. I recently got my hands on the DIY Edition of the Framework Laptop 13” powered by an AMD Ryzen processor, and let me tell you: the build process was an absolute blast.
From snapping the modular expansion cards into place to tightening the last captive screw on the chassis, every step felt like a victory. No glue, no proprietary roadblocks—just a beautifully engineered machine that felt truly like my laptop by the time I was done. But hardware is only half the battle. To make this AMD Ryzen beast really sing, I needed the right operating system.
Enter Omarchy.
Why Omarchy?
If you haven’t heard of Omarchy yet, you’re missing out. Created by David Heinemeier Hansson (DHH), it’s a brilliant, opinionated Linux distribution based on Arch Linux and the Hyprland tiling window manager. Instead of spending an entire weekend writing config files to make Arch usable, Omarchy gives you a gorgeous, keyboard-driven developer setup right out of the box. Zero bloat, beautiful aesthetics, and lightning-fast performance.
But as with any great Linux adventure, getting it installed required a little bit of a hack.
The “Aha!” Moment: Conquering Secure Boot
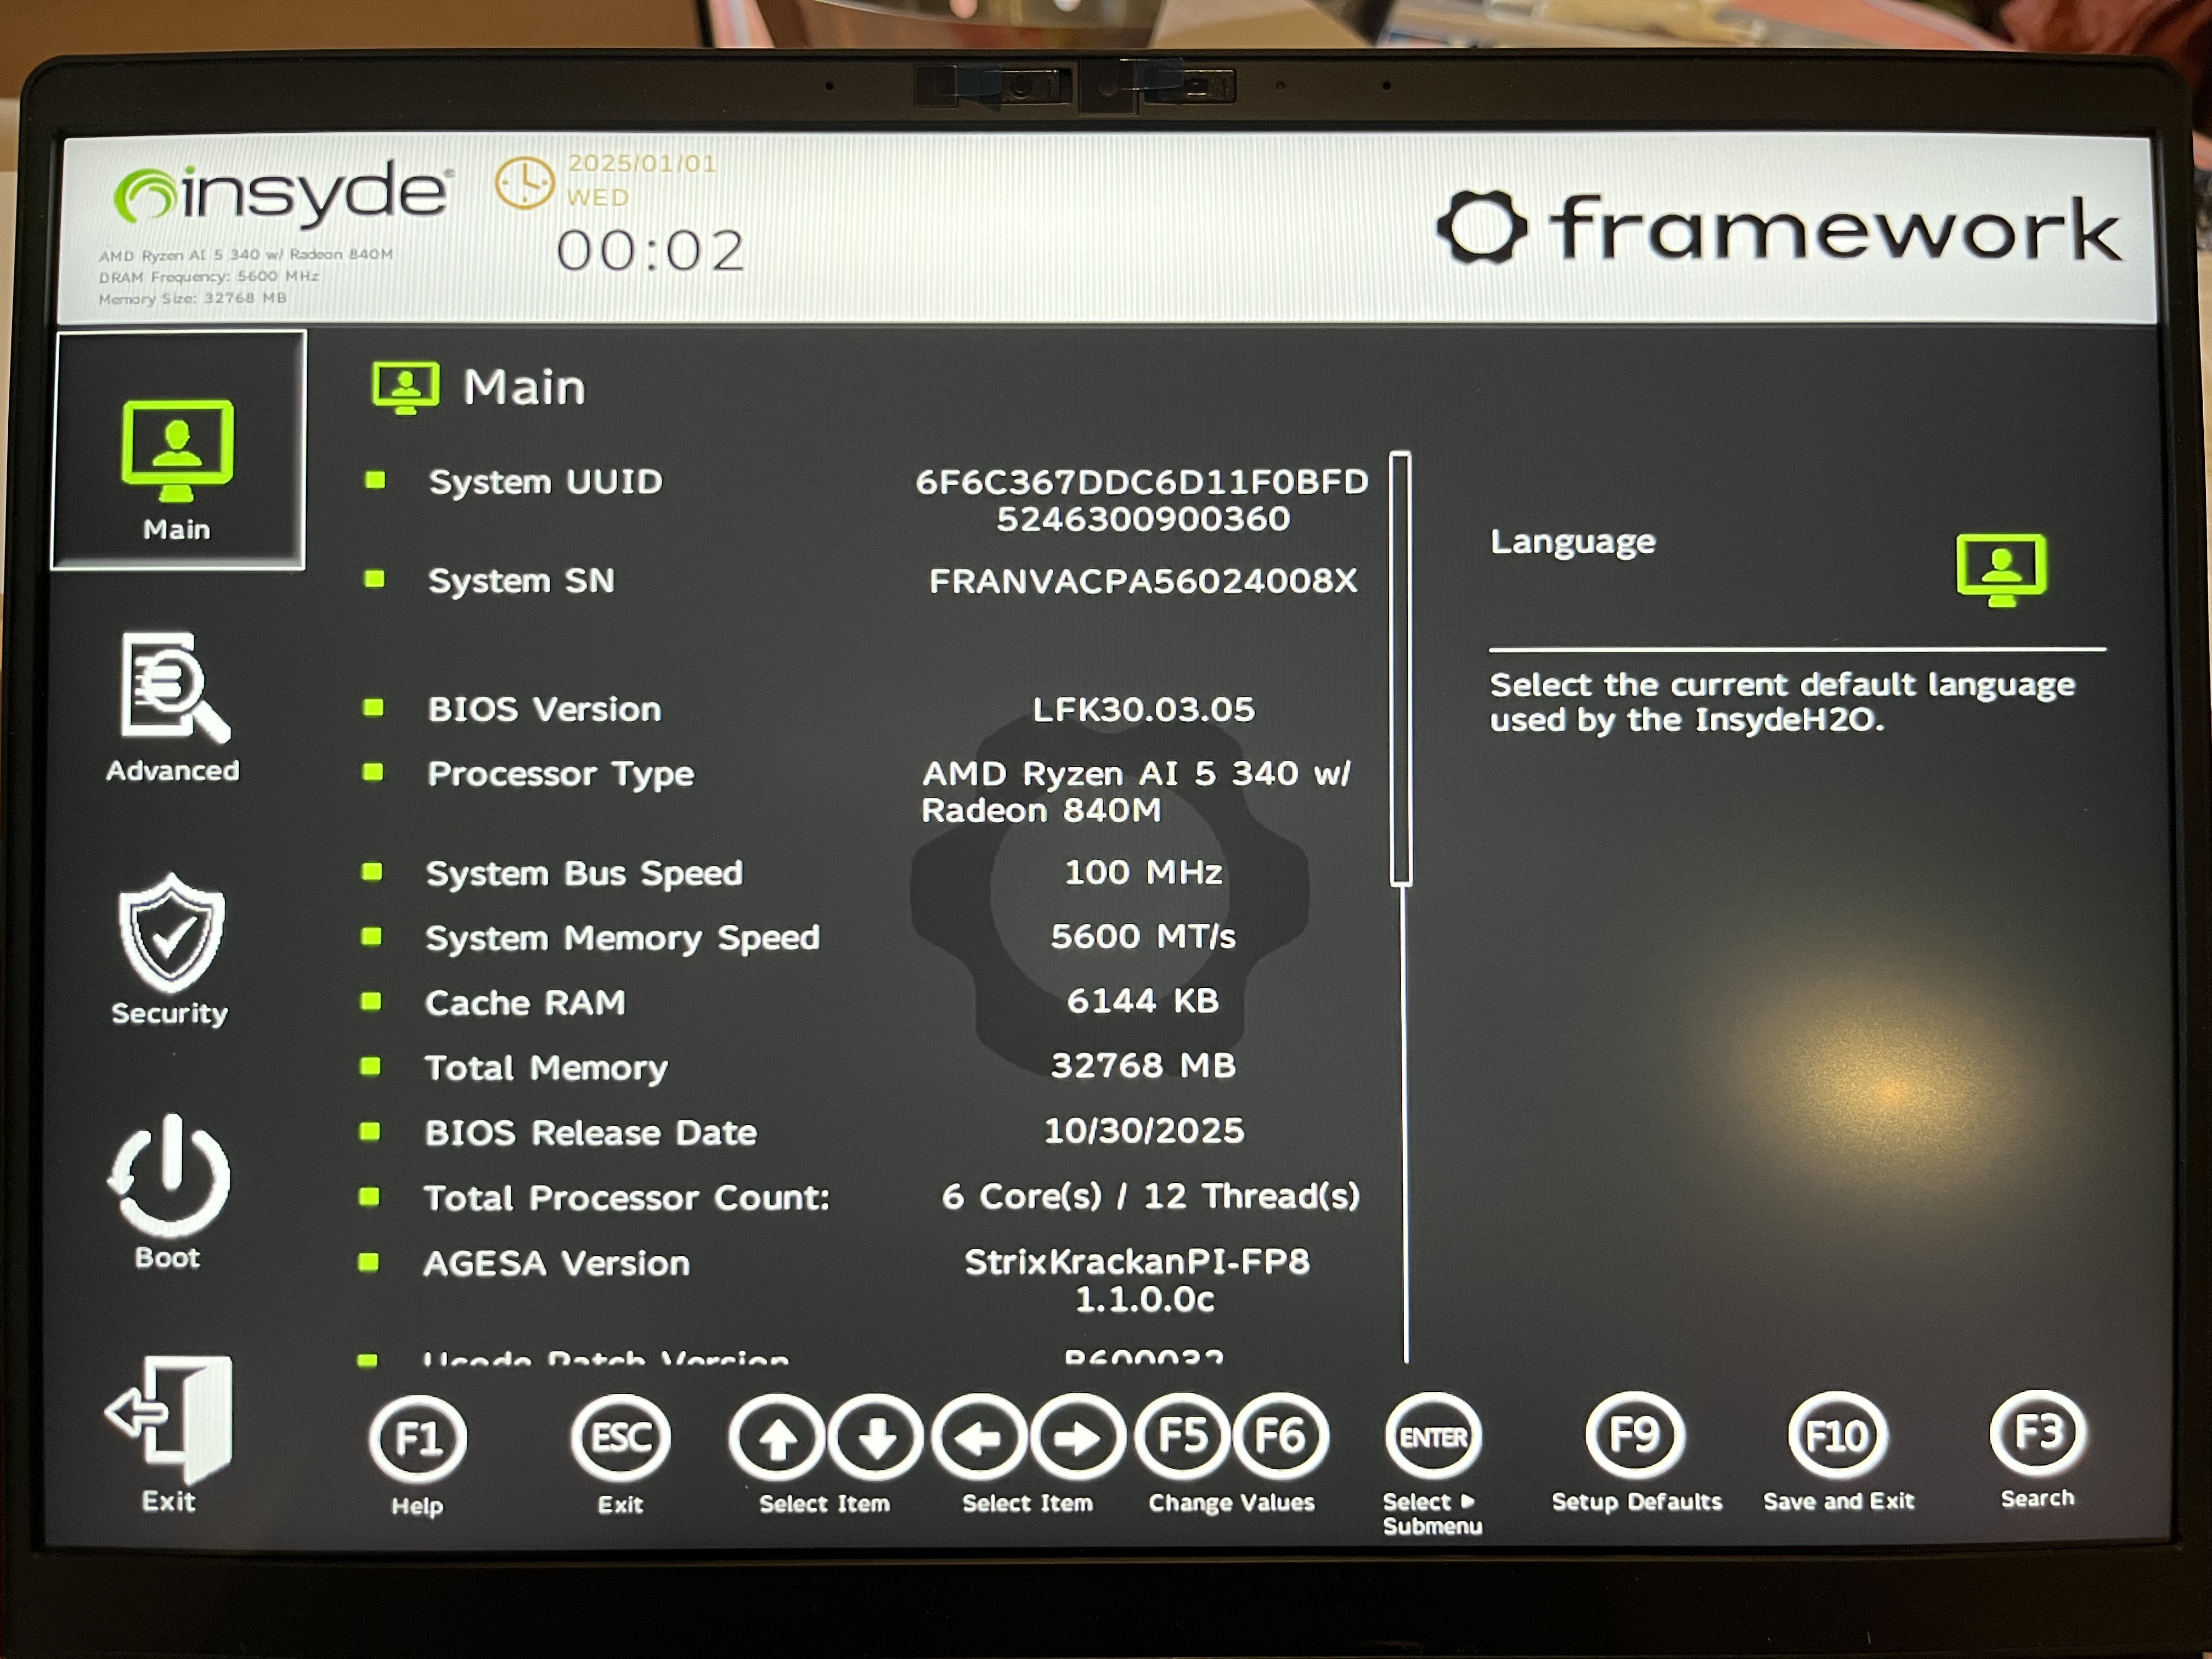
Omarchy, like many independent Linux distributions, requires you to disable Secure Boot in the BIOS before installation. Simple enough, right? I mashed the F2 key on boot, navigated to the Security tab in the Framework’s BIOS, and found the “Force Secure Boot” toggle.
Except… it was grayed out. Untouchable. Un-toggleable.
I spent a good twenty minutes scratching my head, wondering if I had missed a firmware update or if my glorious new laptop was locking me out. After some deep-dive research, I finally discovered the secret handshake.
If you are going down this same road and find yourself locked out of the Secure Boot settings, here is exactly how you bypass it:
-
Enter the BIOS: Reboot your Framework and tap
F2to enter the BIOS setup. - Navigate to the Security Tab: Use your arrow keys to slide over to the Security section.
-
Set a Master/Supervisor Password: This is the magic key! Find the option to set a Supervisor or Master Password. You can make it something simple for now (like
1234), but do not forget it. - Unlock the Toggle: As soon as you set that password and hit enter, the BIOS elevates your privileges. Suddenly, that stubborn “Secure Boot” option is no longer grayed out.
- Disable Secure Boot: Toggle it off.
- Clear the Password (Optional but recommended): If you don’t want a BIOS password slowing you down every time you tweak your settings, you can now go back and remove it (usually by choosing to change the password, entering your current one, and leaving the “new password” fields blank). Secure Boot will remain disabled!
-
Save and Exit: Hit
F10to save your changes and reboot.
Booting Into the Future
With Secure Boot out of the way, the Omarchy ISO booted up flawlessly. The installation was incredibly smooth, and within minutes, I was staring at a stunning Hyprland desktop.
The marriage of the Framework 13’s crisp 3:2 display, the raw multi-core power of the AMD Ryzen chip, and the streamlined, keyboard-centric workflow of Omarchy is nothing short of incredible. Super + Space to launch apps, a blazingly fast terminal ready to go, and a system that feels completely tailored to productivity.
If you’re on the fence about picking up a Framework or diving into the world of Arch-based tiling window managers, consider this your sign. Yes, you might have to wrestle with a BIOS password for a hot second, but the reward on the other side? A modular, lightning-fast machine that is 100% yours.
Happy hacking!
Dockerfile
How we build our image
# Builder Stage
FROM hexpm/elixir:1.19.5-erlang-28.4-debian-bookworm-20260223-slim AS builder

ENV MIX_ENV=prod

WORKDIR /build

# Install build dependencies
RUN apt-get update -y && apt-get install -y build-essential git \
    && apt-get clean && rm -f /var/lib/apt/lists/*_*

# Install hex and rebar
RUN mix local.hex --force && mix local.rebar --force

# Install mix dependencies
COPY mix.exs mix.lock ./
COPY config config
COPY README.md README.md
COPY CHANGELOG.md CHANGELOG.md
COPY TODO.md TODO.md
RUN mix deps.get --only $MIX_ENV
RUN mix deps.compile
#RUN mix docs

# Copy application code
COPY priv priv
COPY lib lib
COPY assets assets
COPY doc priv/static/docs

# Deploy assets
# Provide dummy environment variables for config/runtime.exs evaluation during build
ENV DATABASE_URL=ecto://postgres:postgres@localhost/w_app_core_prod
#ENV SECRET_KEY_BASE=dummy_secret_key_base_for_build_only_must_be_at_least_64_bytes_long_so_we_add_some_more_chars_here

# Compile the release
RUN mix compile
RUN mix assets.deploy
RUN mix release

# Runner Stage
FROM debian:bookworm-slim AS runner

ENV MIX_ENV=prod

# Install runtime dependencies including wkhtmltopdf
# wkhtmltopdf fontconfig libjpeg62-turbo libxrender1 xfonts-75dpi xfonts-base \
# pdftk \
RUN apt-get update -y && \
    apt-get install -y libstdc++6 openssl libncurses5 locales \
    && apt-get clean && rm -f /var/lib/apt/lists/*_*

# Set the locale
RUN sed -i '/en_US.UTF-8/s/^# //g' /etc/locale.gen && locale-gen

ENV LANG=en_US.UTF-8
ENV LANGUAGE=en_US:en
ENV LC_ALL=en_US.UTF-8

WORKDIR /app

# Copy the built release from the builder stage
COPY --from=builder /build/_build/prod/rel/w_app_core ./
COPY doc priv/static/docs

# Expose default port
EXPOSE 4000

CMD ["sh", "-c", "/app/bin/w_app_core eval WAppCore.Release.migrate && /app/bin/w_app_core start"]
````docker-compose example
docker-compose.yml
That is an example of one of our docker-compose.yml files.
version: '3.3'
services:

  # ── nginx ── TLS termination + reverse proxy ────────────────────────────────
  # See /etc/nginx/sites-available/blog.iboard.cc

  # ── Phoenix application ─────────────────────────────────────────────────────
  web:
    image: iboard/blog:latest
    env_file:
      - .env
    volumes:
      - ./data/uploads:/app/uploads
      - ./data/docs:/app/lib/w_app_core-0.1.0/priv/static/docs
      - ./data/images:/app/lib/w_app_core-0.1.0/priv/static/images
    ports:
      - ${EXPOSE_PORT}:${PORT}
    networks:
      - instance_network
    depends_on:
      - db
    restart: unless-stopped

  # ── PostgreSQL ──────────────────────────────────────────────────────────────
  db:
    image: postgres:16-alpine
    env_file:
      - .env
    volumes:
      - ./data/postgres:/var/lib/postgresql/data
    expose:
      - "5432"
    networks:
      - instance_network
    healthcheck:
      test: ["CMD-SHELL", "pg_isready -U ${PGUSER}"]
      interval: 10s
      timeout: 5s
      retries: 5
    restart: unless-stopped

networks:
  instance_network:
    driver: bridge
    ipam:
      config:
        # A /29 subnet provides 8 IP addresses, which is perfectly small for two containers
- subnet: ${NETWORK_SUBNET}e-Matrix Innovations GmbH
.png)
We deliver complete solutions
Corporate E-Learning
– from Idea to Go-Live
As a full-service e-learning provider, we support you from concept to rollout — with a system, content and expertise.
e-Matrix Innovations GmbH, 4600 Wels, Austria
Instruction System
Manage, organize and document all instructions centrally – with our digital instruction system.
Our digital instruction system allows you to manage all training and instructions in one central location. Automatic reminders, certificates, and comprehensive documentation ensure seamless record-keeping.
Visitor Instruction
Digital solutions for instructing visitors, contractors and suppliers – simple, efficient and legally compliant.
Instruct visitors, contractors and suppliers digitally – before entering your premises or directly on site. Legally compliant documentation of all instructions.
Standardized E-Trainings
Ready-made digital training for workplace safety, IT awareness, compliance and corporate training – ready to use and legally compliant.
Our standardized e-trainings cover a wide range of topics and are ready to use immediately. All modules meet legal requirements and are available in multiple languages.
Topics
- Workplace Safety
- Compliance
- Cyber Security Awareness Trainings (Fit4)
Elixir Conf 2018, Belveue, Seattle
A great conference where I met a lot of old friends.
Framework Laptop 13¨

My new Framework Laptop. It comes in parts and is fun to assemble it all on myself. It works great with Omarchy once the pieces are stuck together.
Delivered in Parts

But mine

Not theirs

😄

Review of the Remarkable Paper Pro

I’ve been using the Remarkable since 2021, and it has become an indispensable part of my daily routine. As someone who loves the feel of writing on paper but needs the convenience of digital notes, the Remarkable has been a game-changer. Now I received the Paper Pro.
The Writing Experience
The first thing that struck me about the Remarkable is how natural it feels to write on. The textured surface of the screen and the pressure-sensitive stylus create an experience that is remarkably close to writing on paper. There’s no lag, and the “ink” flows smoothly from the stylus. It’s a joy to use for everything from jotting down quick notes to long-form writing.
My Daily Organizer
I use my Remarkable with the “My Daily Organizer” template, and it has completely transformed my productivity. The template provides a structured way to plan my day, set goals, and track my progress. Having all my notes, to-do lists, and calendar in one place, with the ability to search and organize them, is incredibly powerful.
There is a YouTube channel, named My Deep Guide, where the author, Vojislav Dimitrijevic, talks about all kind of e-ink devices and analyzes them. It was his channel, leading me to the ReMarkable.
A Distraction-Free Zone
In a world full of notifications and distractions, the Remarkable is a breath of fresh air. It’s a dedicated device for writing and reading, with no browser, no email, and no social media. This focus on a single task has had a significant impact on my ability to concentrate and get things done.
Final Thoughts
After more than four years of daily use, I can confidently say that the Remarkable Paper Pro is one of the best investments I’ve made in my productivity. It’s a beautifully designed device that delivers on its promise of a paper-like digital writing experience. If you’re looking for a way to bridge the gap between the analog and digital worlds, I highly recommend giving the Remarkable a try.
Omarchy on a MacBook Pro from 2017
My Omarchy Experience on a 2017 MacBook Pro

It’s not every day that a new operating system truly impresses me, especially when running on older hardware. However, my recent experience with Omarchy on my trusty 2017 MacBook Pro has been overwhelmingly positive. This setup has, hands down, provided the best development environment I’ve encountered to date.
For years, this particular MacBook Pro has been a workhorse. While it’s still a capable machine, newer macOS versions have sometimes felt a bit sluggish, and the overall experience wasn’t as snappy as it once was. Enter Omarchy. From the moment I installed it, the system felt revitalized. The interface is clean, intuitive, and remarkably responsive, breathing new life into the hardware.
The Good: A Superior Development Setup
What truly sets Omarchy apart for me is its out-of-the-box readiness for software development, particularly for my Elixir and Phoenix projects. The underlying architecture seems incredibly well-optimized, and I’ve found that all my development tools and dependencies integrated seamlessly. Compiling Elixir code, running Phoenix servers, and managing dependencies feel incredibly fast and efficient. The responsiveness of the terminal, the smooth operation of my IDE, and the overall lack of friction in my daily workflow are truly remarkable. It genuinely feels like Omarchy was designed with developers in mind, offering a stable and powerful foundation for crafting applications.
The Not-So-Good: Camera and Audio Workarounds
No system is perfect, and my experience with Omarchy did hit one minor snag: the built-in camera and audio on my 2017 MacBook Pro are not recognized or functional. While this is a slight inconvenience, it’s easily remedied. I’ve opted to use external USB devices for both my camera and microphone, which actually provide better quality anyway. It’s a small workaround for an otherwise exceptional operating system.
The Future: Dedicated Elixir and Phoenix Development
Moving forward, this 2017 MacBook Pro, powered by Omarchy, will be my dedicated machine for all Elixir and Phoenix development. The performance gains and the sheer joy of working in such a streamlined environment have convinced me that this is the optimal setup. For anyone looking to breathe new life into older Apple hardware and create a top-tier development workstation, especially for Elixir and Phoenix, I wholeheartedly recommend giving Omarchy a try. It truly is the best setup for developing I’ve had so far.
The Big Move
About my move from Google to kSuite

Moving away from the dominant Big Tech ecosystem often feels like a daunting task—one that usually involves a complex weekend of “digital surgery.” However, I recently made the switch to kSuite the Swiss-based collaborative solution from Infomaniak, and the experience was surprisingly smooth.
If you’re looking for a digital home that values privacy, independence, and cost-effectiveness without the “Silicon Valley” strings attached, here is why kSuite should be on your radar.
🚀 The “Sunday Afternoon” Migration
One of the biggest hurdles to leaving Google or Microsoft is the sheer volume of data: domains, years of emails, and gigabytes of documents.
I set aside a Sunday afternoon for the move, and to my surprise, that was all it took. Infomaniak provides intuitive import tools that handle the heavy lifting. I was able to:
- Transfer my domain with minimal downtime.
- Sync my entire email history via their IMAP migration tool.
- Move my documents over to kDrive (their cloud storage) seamlessly.
By the time the sun went down, my old accounts were empty, and my new Swiss-hosted digital workspace was ready to go.
🛠️ Performance “In Production”
I’ve now been using kSuite for a few days in my daily workflow, and the “honeymoon phase” isn’t wearing off. Here’s the breakdown:
- Reliability: Everything works exactly as expected. Mail delivery is instant, and sync is snappy.
- The “Better” Factor: Some features actually outperform the giants. The kDrive interface is remarkably clean, and the integration of OnlyOffice means I can edit Word, Excel, and PowerPoint files directly in the browser without the bloat of Microsoft 365.
- Privacy by Design: Knowing my data is hosted in Switzerland—under some of the world’s strictest privacy laws—provides a peace of mind that’s hard to quantify until you actually make the move.
💰 The Bottom Line: Costs & Philosophy
What truly sets kSuite apart isn’t just the tech, but the business model.
Infomaniak is independent and employee-owned. They aren’t beholden to shareholders demanding data-mining for ad revenue. Their pricing is refreshing:
- Transparent: No hidden “introductory” rates that double after a year.
- Competitive: For many users, the Standard tier is essentially free (including your own domain mail), and the paid tiers offer massive storage (up to 6 TB) for a fraction of what “Big Tech” charges for similar enterprise features.
Final Thoughts
Switching to a sovereign, ethical cloud doesn’t have to be a sacrifice. After 48 hours in production, I haven’t missed a single feature from my old providers. In fact, the speed and simplicity of the Swiss approach have made my workflow feel lighter.
Deployment Files
The Docker-Compose File (run)
The following file docker-compose.yml is used to run a docker-container with an image
created in Dockerfile.
The dockerfile builds the phoenix-release of iBoard blog.
The docker-compose file packs a stack with two services.
- web (The Phoenix application)
- db (A Postgres database)
docker-compose.yml
services:
  db:
    image: postgres:16-alpine
    environment:
      POSTGRES_USER: ${PGUSER:-blog}
      POSTGRES_PASSWORD: ${PGPASSWORD:?Set PGPASSWORD in .env}
      POSTGRES_DB: ${PGDATABASE:-blog_prod}
    volumes:
      - ./data/postgres:/var/lib/postgresql/data
    expose:
      - "5432"
    networks:
      - backend
    restart: unless-stopped
    healthcheck:
      test: ["CMD-SHELL", "pg_isready -U ${PGUSER:-blog}"]
      interval: 10s
      timeout: 5s
      retries: 5

  web:
    image: iboard/blog:latest
    env_file:
      - path: ./.env
        required: false
    environment:
      PHX_SERVER: "true"
      # Endpoint
      ENDPOINT_HOST: ${ENDPOINT_HOST:?Set ENDPOINT_HOST in .env}
      ENDPOINT_SCHEME: ${ENDPOINT_SCHEME:-https}
      ENDPOINT_PORT: ${ENDPOINT_PORT:-4000}
      ENDPOINT_IP: ${ENDPOINT_IP:-0.0.0.0}
      # Database — connects to the db service on the internal network
      DATABASE_URL: "ecto://${PGUSER:-blog}:${PGPASSWORD}@db/${PGDATABASE:-blog_prod}"
      POOL_SIZE: ${POOL_SIZE:-10}
      # Security
      SECRET_KEY_BASE: ${SECRET_KEY_BASE:?Set SECRET_KEY_BASE in .env}
      # Mailer
      MAILER_ADAPTER: ${MAILER_ADAPTER:-sendgrid}
      SENDGRID_API_KEY: ${SENDGRID_API_KEY:-}
      # Logging
      LOG_LEVEL: ${LOG_LEVEL:-info}
      # Clustering (optional)
      DNS_CLUSTER_QUERY: ${DNS_CLUSTER_QUERY:-}
    ports:
      # Host port EXPOSE_PORT → container port ENDPOINT_PORT.
      # Put an nginx reverse proxy in front to terminate TLS on 443.
      - "${EXPOSE_PORT:-4000}:${ENDPOINT_PORT:-4000}"
    volumes:
      - ./data/uploads:/app/uploads
    depends_on:
      db:
        condition: service_healthy
    networks:
      - backend
    restart: unless-stopped

networks:
  backend:
    driver: bridge
Dockerfile
The following dockerfile builds an image from a slim Debian, packed with Erlang and Elixir.
It uses mix to build a release and a docker image.
# Builder Stage
FROM hexpm/elixir:1.19.5-erlang-28.4-debian-bookworm-20260223-slim AS builder

ENV MIX_ENV=prod

WORKDIR /build

# Install build dependencies
RUN apt-get update -y && apt-get install -y build-essential git \
    && apt-get clean && rm -f /var/lib/apt/lists/*_*

# Install hex and rebar
RUN mix local.hex --force && mix local.rebar --force

# Install mix dependencies
COPY mix.exs mix.lock ./
COPY config config
COPY README.md README.md
COPY CHANGELOG.md CHANGELOG.md
COPY TODO.md TODO.md
RUN mix deps.get --only $MIX_ENV
RUN mix deps.compile

# Copy application code
COPY priv priv
COPY lib lib
COPY assets assets
# run mix doesn't compile - FIXME: find another way to deploy docs
# RUN mix docs
COPY doc priv/static/docs

# Deploy assets
# Provide dummy environment variables for config/runtime.exs evaluation during build
ENV DATABASE_URL=ecto://postgres:postgres@localhost/w_app_core_prod
#ENV SECRET_KEY_BASE=dummy_secret_key_base_for_build_only_must_be_at_least_64_bytes_long_so_we_add_some_more_chars_here

# Compile the release
RUN mix compile
RUN mix assets.deploy
RUN mix release

# Runner Stage
FROM debian:bookworm-slim AS runner

ENV MIX_ENV=prod

# Install runtime dependencies including wkhtmltopdf
# wkhtmltopdf fontconfig libjpeg62-turbo libxrender1 xfonts-75dpi xfonts-base \
# pdftk \
RUN apt-get update -y && \
    apt-get install -y libstdc++6 openssl libncurses5 locales \
    && apt-get clean && rm -f /var/lib/apt/lists/*_*

# Set the locale
RUN sed -i '/en_US.UTF-8/s/^# //g' /etc/locale.gen && locale-gen

ENV LANG=en_US.UTF-8
ENV LANGUAGE=en_US:en
ENV LC_ALL=en_US.UTF-8

WORKDIR /app

# Copy the built release from the builder stage
COPY --from=builder /build/_build/prod/rel/w_app_core ./
COPY doc priv/static/docs

# Expose default port
EXPOSE 4000

CMD ["sh", "-c", "/app/bin/w_app_core eval WAppCore.Release.migrate && /app/bin/w_app_core start"]Docker Deployment
The Story of “Example Server”: A Humble DevOps Journey
We’ve all been there. You spin up a quick virtual machine to test a simple proof-of-concept. You name it something incredibly generic, like example-server. You manually install a few packages, tweak a config file, and your app is live.
It was only supposed to be an experiment. It was only supposed to live for an afternoon.
But as things usually go in software, the temporary became permanent. Fast forward a bit, and suddenly this little example-server had grown into something I actually had to maintain, update, and care for. It evolved from a quick sandbox into a real learning experience that forced me to grapple with the realities of deployment and infrastructure.
Why Am I Writing This?
I’m not here to write a definitive “How-To” guide or preach about the absolutely perfect, undisputed way to build a deployment pipeline. There are plenty of textbooks and official docs for that.
Instead, I’m starting this series simply to report on my own journey with this server. Over the next few posts, I want to document what I actually did, the mistakes I made, the weird edge cases I ran into, and the incremental improvements I figured out along the way.
Here is a taste of what I’ll be sharing from my notes:
- The “Gotchas”: The manual configurations I forgot about that inevitably broke things later.
- The Upgrades: How I slowly transitioned from “SSH and pray” to slightly more sane deployment practices.
- The Lightbulb Moments: The specific tools and concepts that finally made sense once I applied them to a real, messy environment.
Hoping It Helps
My main goal is just to get these experiences out of my head and onto the page. But my sincere hope is that by sharing my completely unpolished journey, there might be something useful in here for you. Maybe you’ll find a solution to a problem you’re currently stuck on, avoid a pothole I tripped over, or at the very least, feel a little less alone in the wild world of server management.
Stay tuned for the first real chapter of the example-server saga!